Home
Manual Creation of a PeopleSoft CS Demo Database
This post details the creation of a PeopleSoft Campus Solutions demo database on an Oracle 11g instance. The steps below were refined over the course of five different attempts, the first four being unsuccessful, each for a different reason. On the fifth attempt, I used the steps below to successfully get a complete, functional PS CS database online; I have included warnings with information on how to avoid various pitfalls I ran into during prior attempts.
If you choose to follow this post as a comprehensive guide from start to finish, there are three things you should keep in mind:
- This guide assumes you have a working instance of Oracle 11g running and ready to go. If you don’t, you may want to take a look at the steps I took to get my own instance up and running in this post.
- This guide assumes you have an account on Oracle’s eDelivery site.
- This guide assumes that the current year is 2013 or 2014; this guide is unlikely to be relevant, at least in part, a year and a half from now.
The process detailed in this post will take you about 18 hours to complete. Fourteen of those hours will simply involve waiting for a script or process to finish.
And a final note of caution: the detailed nature of this process, coupled with the nuances of your own environment, goals, and deliverable versions, all but ensures that should you choose to follow this guide in its entirety, you will encounter an error or issue that is not covered here. Luckily, almost all of the errors I have encountered were solvable using info posted by others online, which is why I am posting this here in hopes that I, in turn, can help someone with this long and often frustrating process.
Preliminary Information
- The database server I used in the steps below was an s1.small instance hosted on AWS; OS was Oracle Linux, database server was Oracle 11g R3.
- Several files from Oracle’s eDelivery, including a few exceeding 1GB in size, are required in the steps below. It is highly recommended that you use an instance with a fast and reliable Internet connection.
- Due to the lack of a windowing system on the instance being configured, I needed a way to get files that I had downloaded from eDelivery onto the instance. I chose to launch a separate Windows instance, download files as needed to that instance, and host those files on that machine’s port 80 using nginx. On the database instance, I simply used
wgetto retrieve the files from the Windows instance. This approach has the added advantage of being able to take advantage of intra-AWS network speeds, as both instances were EC2 instances.
Note on Formatting
- Many of the steps below are simply reproductions of commands that I executed at a shell prompt:
- Commands prefixed with
$were executed within a normal OS shell. - Commands prefixed with
SQL>were executed within the shell provided by thesqlplusbinary.
- Commands prefixed with
Preparing to Install PeopleSoft PeopleTools on Oracle Linux
- Parts of this section have been adapted from the first part of this post by Nic Gasparotto.
- Connected to instance as
oracleUNIX user. $ su - root$ groupadd psoft$ cd /$ mkdir apps$ cd apps$ mkdir middleware$ mkdir psoft$ chgrp psoft middleware$ chgrp psoft psoft$ chmod g+rwx middleware$ chmod g+rwx psoft- The preceding steps established a location for the PeopleTools and PeopleSoft CS files that will be installed later.
Installing PeopleSoft PeopleTools on Oracle Linux
- Parts of this section have been adapted from this post by Nic Gasparotto.
- Connected to instance as
oracleUNIX user. $ su - root$ useradd -g psoft hc91$ passwd hc91(set password to<redacted-password>)$ su - hc91$ cd /apps/psoft$ mkdir hc91$ cd ~$ wget <private-IP-of-HTTP-server-on-EC2>/V27724-01.zip(PeopleTools 8.52 Disc 1 of 3)$ wget <private-IP-of-HTTP-server-on-EC2>/V27725-01.zip(PeopleTools 8.52 Disc 2 of 3)$ wget <private-IP-of-HTTP-server-on-EC2>/V27726-01.zip(PeopleTools 8.52 Disc 3 of 3)$ unzip V27724-01.zip$ unzip V27725-01.zip$ unzip V27726-01.zip$ rm *.zip$ cd Disk1$ chmod +x setup.sh$ chmod +x InstData/*(not doing this will prevent the Disc 1 installer from calling sub-executables)$ ./setup.sh- Pressed
<Enter>to continue. - Used
zm7ky3w41m044u863q67oke1ms7t1f2as license code. This is the license code for PeopleTools on an Oracle database, as listed here. Note that the dashes must be excluded. - Entered
2for Unicode database. - Entered
0to confirm selection. - Entered
1for next. - Entered
1,2, and4to deselect App Server, Batch Server, and Web Server, respectively, leaving only option 3 (Database Server) selected. - Entered
0for finished. - Entered
1for next. - Entered
/apps/psoft/hc91for installation location. - Entered
1for next. - Left default value of
PSEMHUBfor hub machine name. - Left default value of
80for hub port number. - Entered
1for next. - Left both PeopleTools and PeopleTools System Database options selected.
- Entered
0for finished. - Entered
1for next. - Entered
1to begin installation process. - Pressed
<Enter>to exit installer upon completion. $ cd ~$ rm -rf Disk1 Disk2 Disk3$ nano .bash_profile; appended the following text and wrote file to disk:
appended to: ~/.bash_profile
# MQUINN 09-08-2013
# BEGIN MODIFICATION BLOCK
# These lines were added after successfully
# installing PeopleTools.
export ORACLE_HOME=/u01/app/oracle/product/11.2.0

export LD_LIBRARY_PATH=$LD_LIBRARY_PATH:$ORACLE_HOME/lib
export PATH=$PATH:$ORACLE_HOME/bin

export PS_HOME=/apps/psoft/hc91
export PS_CFG_HOME=$PS_HOME

. $PS_HOME/psconfig.sh

cd $PS_HOME

# END MODIFICATION BLOCK
# MQUINN 09-08-2013
Installing PeopleSoft Campus Solutions on Oracle Linux
- Parts of this section have been adapted from this post by Nic Gasparotto.
- Connected to instance as
oracleUNIX user. $ su - hc91$ wget <private-IP-of-HTTP-server-on-EC2>/V30469-01.zip$ unzip V*.zip$ chmod +x setup.sh$ chmod +x InstData/*$ ./setup.sh- Pressed
<Enter>to continue. - Entered
117fefffff8fffffebfb197c32sm64uas license code. This is the license code for PeopleSoft Human Capital Management / Campus Solutions on an Oracle database, as listed here. Note that the dashes must be excluded. - Entered
2for Unicode database. - Entered
0to finish. - Entered
1for next. - Entered
1,2, and4to disable App Server, Batch Server, and Web Server, respectively. Only option 3 (Database Server) left as selected. - Entered
0to finish. - Entered
1for next. - Entered
/apps/psoft/hcm91for installation location (recall that this is the same directory to which PeopleTools was installed). - Disabled features 11 through 14 and features 16 through 30. Only Global Payroll Core and Global Payroll United States should remain checked, in addition to all other features.
- Entered
0to finish. - Entered
1for next. - Pressed
<Enter>to continue. - Entered
1for next. - Pressed
<Enter>to exit installer. $ cd ~$ rm V*.zip$ rm -rf Disk1
Snapshotting EC2 Volume
- Created a snapshot on EC2 of the instance volume at this point.
A Note about Manual vs Wizard Database Creation
- At this point, the core PeopleSoft files needed for database creation are on the filesystem. There are two paths to choose from at this point:
- Use the database creation wizard provided by PeopleSoft. This wizard is delivered as a shell script and modifies files and executes scripts that you would otherwise need to execute by hand. The downside to the wizard is that it is inflexible and prone to error, as Nic Gasparotto demonstrates here. Should you decide to use the wizard, keep in mind that you will need to first install Oracle Tuxedo on the instance hosting your database server.
- Modify core files and execute scripts yourself. Manual creation takes longer and is more prone to user error than the wizard route, but it is had the advantage of better documentation, both online and in the PeopleTools 8.52 Installation for Oracle PeopleBook. This is the creation method used in the next section.
Manually Initializing CS Database on Oracle 11g
- Parts of this section have been adapted from this post (part 1 of 3) by Nic Gasparotto.
- Nic uses some directory paths that don’t match up with those in my environment, given that he installed Oracle 11g himself whereas I used a disk image with Oracle 11g pre-configured. I used the following list to translate the paths Nic used to paths suitable for my environment:
/apps/oracle/admin(Nic) =/u01/app/admin(me)/oradata/<SID>(Nic) =/u01/oradata/<SID>(me)
- Nic uses some directory paths that don’t match up with those in my environment, given that he installed Oracle 11g himself whereas I used a disk image with Oracle 11g pre-configured. I used the following list to translate the paths Nic used to paths suitable for my environment:
- This section aligns itself with the start of Appendix B in the PeopleTools 8.52 Installation for Oracle PeopleBook. Where the PeopleBook differs from Nic’s post, I will defer to the PeopleBook, as Nic’s post precedes publication of the PeopleBook by ~2 years.
- I chose to use
ENTCSDEVas the SID of the database to be created. - Connected to instance as
oracleUNIX user. $ mkdir -p /u01/oradata/ENTCSDEV/datafiles$ mkdir -p /u01/oradata/ENTCSDEV/ctlfiles$ mkdir -p /u01/oradata/ENTCSDEV/redologs$ cd /u01/app/admin$ mkdir -p ENTCSDEV/pfile$ mkdir -p ENTCSDEV/create$ cd ENTCSDEV/create$ cp /apps/psoft/hc91/scripts/unix/* .(don’t forget trailing period)$ cd ../pfile$ touch initENTCSDEV.ora$ nano initENTCSDEV.ora; inserted the following text and wrote to disk:
initENTCSDEV.ora
DB_NAME = ENTCSDEV
DB_FILES = 1021
CONTROL_FILES = /u01/oradata/ENTCSDEV/ctlfiles/ctlfile01.ctl,/u01/oradata/ENTCSDEV/ctlfiles/ctlfile02.ctl
OPEN_CURSORS = 1000
db_block_size = 8192
NLS_LENGTH_SEMANTICS = CHAR
#MQUINN 09-08-2013
#Commenting out remote_login_passwordfile as
#no password file will be used.
#See page 665 of PeopleTools 8.52 Installation
#for Oracle PeopleBook (Task B-2, step 5)
#remote_login_passwordfile = EXCLUSIVE
- Skipped Task B-4 in the PeopleTools 8.52 Installation for Oracle PeopleBook, which states that
NLS_LANGmust be set in the Windows registry on each workstation that will be accessing the PeopleSoft application in two-tier mode. After checking both my local and remote Windows Server instances, I did not find a node namedOracleunderHKEY_LOCAL_MACHINE, so I was not able to set a value forNLS_LANG. $ cd ../create$ nano createdb10.sql. I removed all text following the linespool createdb.logand appended the following before writing to disk:
createdb10.sql
startup nomount pfile=/u01/app/admin/ENTCSDEV/pfile/initENTCSDEV.ora

create database     ENTCSDEV
    maxdatafiles    1021
    maxinstances    1
    maxlogfiles     8
    maxlogmembers   4
    CHARACTER SET AL32UTF8
    NATIONAL CHARACTER SET UTF8
DATAFILE '/u01/oradata/ENTCSDEV/system01.dbf' SIZE 2000M REUSE AUTOEXTEND ON NEXT 10240K MAXSIZE UNLIMITED
EXTENT MANAGEMENT LOCAL
SYSAUX DATAFILE '/u01/oradata/ENTCSDEV/sysaux01.dbf' SIZE 120M REUSE AUTOEXTEND ON NEXT 10240K MAXSIZE UNLIMITED
DEFAULT TEMPORARY TABLESPACE TEMP TEMPFILE '/u01/oradata/ENTCSDEV/temp01.dbf' SIZE 20M REUSE AUTOEXTEND ON NEXT 640K MAXSIZE UNLIMITED
UNDO TABLESPACE "PSUNDOTS" DATAFILE '/u01/oradata/ENTCSDEV/psundots01.dbf' SIZE 300M REUSE AUTOEXTEND ON NEXT 5120K MAXSIZE UNLIMITED
LOGFILE GROUP 1 ('/u01/oradata/ENTCSDEV/redo01.log') SIZE 100M,
    GROUP 2 ('/u01/oradata/ENTCSDEV/redo02.log') SIZE 100M,
    GROUP 3 ('/u01/oradata/ENTCSDEV/redo03.log') SIZE 100M;
spool off
$ export ORACLE_SID=ENTCSDEV$ sqlplus / as sysdbaSQL> @createdb10.sql- After ~2 minutes, sqlplus echoed back “Database created.”
SQL> create spfile='/u01/app/admin/ENTCSDEV/pfile/spfileENTCSDEV.ora' from pfile='/u01/app/admin/ENTCSDEV/pfile/initENTCSDEV.ora';- sqlplus echoed back “File created.”
SQL> shutdown immediateSQL> quit$ cd $ORACLE_HOME/dbs$ ln -s /u01/app/admin/ENTCSDEV/pfile/spfileENTCSDEV.ora .(don’t forget the trailing period)$ cd /u01/app/admin/ENTCSDEV/create$ sqlplus / as sysdbaSQL> startupSQL> quit$ nano utlspace.sql; I made three changes:- replaced all occurrences of
<SID>withENTCSDEV - replaced all occurrences of
/u03with/u01 - increased the size of the
PSTEMPtablespace from300Mto1000M. If you leave the size of the PSTEMP tablespace at 300M, you risk the following error or a similar one when you later run the Data Mover script to load the PeopleSoft CS demo data into the new database:
- replaced all occurrences of
Data Mover error related to insuffient space in PSTEMP
Importing  GPCH_TX_RATES
Creating Table  GPCH_TX_RATES
Rows inserted into GPCH_TX_RATES
...
Import  GPCH_TX_RATES  6273242
Building required indexes for GPCH_TX_RATES
 - SQL Error. Error Position: 0  Return: 12801 - ORA-12801: error signaled in parallel query server P000 ORA-01652: unable to extend temp segment by 16 in tablespace PSTEMP

CREATE UNIQUE  iNDEX PS_GPCH_TX_RATES ON PS_GPCH_TX_RATES (GPCH_TX_CANTON,    GPCH_TX_PCT_TYPE,    EFFDT DESC,    GPCH_TX_TRF_CD,    SEX,    GPCH_TX_LOW_GROSS) TABLESPACE PSINDEX STORAGE (INITIAL 40000 NEXT 100000 MAXEXTENTS UNLIMITED PCTINCREASE 0) PCTFREE 10 PARALLEL NOLOGGING
Error: Unable to process create statement for GPCH_TX_RATES
 SQL Spaces: 0  Tables: 4764  Triggers: 0 Indexes: 5878  Views: 0
Ended: Mon Sep 09 07:14:04 2013
Unsuccessful completion
$ sqlplus / as sysdbaSQL> @utlspace.sql- After ~10 mins, sqlplus finished successfully.
SQL> @dbowner.sql(no modifications necessary before execution)- Script executed successfully.
SQL> quit$ nano hcddl.sql; I made three changes:- replaced all occurrences of
/u04with/u01 - replaced all occurrences of
<SID>withENTCSDEV - removed the
REMARKprefix from the autoextending tablespace lines, thereby enabling autoextension of tablespaces (these are the lines comprising the second half of the file)
- replaced all occurrences of
$ sqlplus system/manager as sysdbaSQL> @hcddl.sql- After ~10 mins, sqlplus finished successfully.
SQL> quit$ sqlplus system/managerSQL> @psroles.sql(no modifications necessary before execution)- Script executed successfully.
SQL> @psadmin.sql(no modifications necessary before execution)- When prompted, entered
SYSADMfor name of PeopleSoft Owner ID. - When prompted, entered
SYSADMfor password of PeopleSoft Owner ID. - When prompted, entered
PSDEFAULTfor default tablespace. - Script executed successfully.
SQL> @connect.sql(no modifications necessary before execution)- Script executed successfully.
SQL> quit
Dropping Previous Database from Oracle 11g
- On the Oracle 11g instance I used, I had a database with an SID of
ENTPSDBthat I no longer needed access to. To conserve disk space, I dropped it via the following steps:$ export ORACLE_SID=ENTPSDB$ sqlplus / as sysdbaSQL> shutdown immediateSQL> startup mount exclusive restrictSQL> drop database;SQL> quit
Configuring the New Database for Oracle Net Connectivity
- I made modifications to four different files in order to enable Oracle Net connections to be established to the newly created
ENTCSDEV. The entire contents of those four files are included in this section.
~/.bash_profile (for oracle UNIX user)
# .bash_profile

# Get the aliases and functions
if [ -f ~/.bashrc ]; then
    . ~/.bashrc
fi

# User specific environment and startup programs

PATH=$PATH:$HOME/bin

export PATH

## Oracle Setup ##
umask 022
ORACLE_BASE=/u01/app
ORACLE_HOME=/u01/app/oracle/product/11.2.0/db_1
JAVA_HOME=${ORACLE_HOME}/jdk
PS1="`whoami`@`uname -n`:[\$PWD]`echo -e '\n$ '`"
PATH=${ORACLE_HOME}/bin:${JAVA_HOME}/bin:$PATH
EDITOR=vi
set -o vi

export ORACLE_BASE ORACLE_HOME PS1 PATH EDITOR
export ORACLE_HOSTNAME=ec2-xxx-xxx-xxx-xxx.compute-1.amazonaws.com
export ORACLE_SID=ENTCSDEV
export ORACLE_UNQNAME=ENTCSDEV
$ORACLE_HOME/network/admin/listener.ora
SID_LIST_LISTENER =
 (SID_LIST =
   (SID_DESC =
     (GLOBAL_DBNAME = ENTCSDEV)
     (SID_NAME = ENTCSDEV)
     (ORACLE_HOME = /u01/app/oracle/product/11.2.0/db_1)
     (PROGRAM = extproc)
   )
 )

LISTENER =
  (DESCRIPTION_LIST =
    (DESCRIPTION =
      (ADDRESS = (PROTOCOL = TCP)(HOST = ec2-xxx-xxx-xxx-xxx.compute-1.amazonaws.com)(PORT = 1521))
    )
  )
$ORACLE_HOME/network/admin/tnsnames.ora
ENTCSDEV =
  (DESCRIPTION =
    (ADDRESS = (PROTOCOL = TCP)(HOST = ec2-xxx-xxx-xxx-xxx.compute-1.amazonaws.com)(PORT = 1521))
    (CONNECT_DATA =
      (SERVER = DEDICATED)
      (SERVICE_NAME = ENTCSDEV)
    )
  )
/etc/oratab
# This file is used by ORACLE utilities.  It is created by root.sh
# and updated by the Database Configuration Assistant when creating
# a database.

# A colon, ':', is used as the field terminator.  A new line terminates
# the entry.  Lines beginning with a pound sign, '#', are comments.
#
# Entries are of the form:
#   $ORACLE_SID:$ORACLE_HOME:<N|Y>:
#
# The first and second fields are the system identifier and home
# directory of the database respectively.  The third filed indicates
# to the dbstart utility that the database should , "Y", or should not,
# "N", be brought up at system boot time.
#
# Multiple entries with the same $ORACLE_SID are not allowed.
#
ENTCSDEV:/u01/app/oracle/product/11.2.0/db_1:Y
Remember to bounce lsnrctl before attempting to connect after changing any of the above files. You should also ensure that the database comes back online after the instance restarts; the Y flag in /etc/oratab is responsible for that.
If lsnrctl refuses to start due to a syntax error, chances are that a stray line break in either listener.ora or tnsnames.ora is the cause of the problem.
Using SQL Developer, I was able to connect to the database using the following settings:
- Username:
SYSADM - Password:
SYSADM - Connection Type:
Basic - Role:
default - Hostname:
xxx.xxx.xxx.xxx - Port:
1521 - SID:
ENTCSDEV
Using SQL *Plus on the database server itself, I was able to connect using the Owner ID by running sqlplus SYSADM/SYSADM@ENTCSDEV.
Preparing to Load Campus Solutions Objects into Newly Created Database
- Parts of this section have been adapted from this post (part 2 of 3) by Nic Gasparotto.
- This section aligns itself with the start of Task B-12 in Appendix B in the PeopleTools 8.52 Installation for Oracle PeopleBook.
- A PeopleSoft client workstation running Windows is required for the remainder of this guide. I cover the steps required to set one up in this post.
- On the Windows workstation, I opened
C:\oracle\product\11.2.0\client_1\network\admin\tnsnames.oraand added an entry forENTCSDEVpointing to the remote Oracle Linux instance. The workstation I used was on EC2, so I was able to use the private IP of the Oracle Linux instance. If the workstation had not been hosted on EC2, I would have used either the Elastic IP or the public hostname of the Oracle Linux instance. - Opened Configuration Manager on the workstation and changed the following fields:
- Database Type:
Oracle - Database Name:
ENTCSDEV - Connect ID:
people - Connect Password:
peop1eNote the use of the numeral1in the Connect Password, rather than the letterl. This is the default password for the Connect ID. Thank you Lynda for posting about this easily overlooked subtlety.
- Database Type:
- While in Configuration Manager, I went to the
Profiletab, chose toEdittheDefaultprofile, and ensured that the values for PS_HOME, PS_APP_HOME, and DBBIN were specified correctly (note that the value for PS_APP_HOME should be the same as the value for PS_HOME). - Closed Configuration Manager.
- Opened Data Mover and successfully signed into ENTCSDEV as SYSADM using SYSADM as password.
Snapshotting EC2 Volume
- Created a snapshot on EC2 of the instance volume at this point. I also chose to take this opportunity to increase the size of the instance volume from 50GB to 70GB, as disk usage was at 63% of 50GB. The PS CS demo database can exceed 19GB in size, so this step should be taken now, before the data is loaded into the database; although the underlying tablespace files had already been created by this point, I chose to increase the disk size as a precaution.
- Note that to resize the volume, I had to create a snapshot, then create a 70GB volume from that snapshot. Once the new volume was attached and the instance was booted, I logged in as the
rootUNIX user and ranresize2fs /dev/sda1to expand the partition table.
Loading Campus Solutions Objects into Newly Created Database
- Signed into Data Mover on the Windows workstation using Owner ID (SYSADM) and Owner ID Password (SYSADM) - by signing into Data Mover with the Owner ID, Data Mover will start in “bootstrap mode”.
- Clicked
File>Database Setup. - Used
Oraclefor Target Database,Unicodefor Database Type,AL32UTF8for Character Set. - Clicked
Next. - Chose
Demofor Database Type. - Highlighted
PeopleSoft HRCS Database - US Englishand clickedAdd. - Clicked
Next. - Entered
SYSADMfor Access Password. - Left the defaults for all other values: Database Name is
ENTCSDEV, Symbolic ID isSYSADM1, Access ID isSYSADM, Connect ID isPEOPLE. - Clicked
Finish. - Clicked green stoplight icon to run generated Data Mover Script at 2pm EST on 09/09/2013.
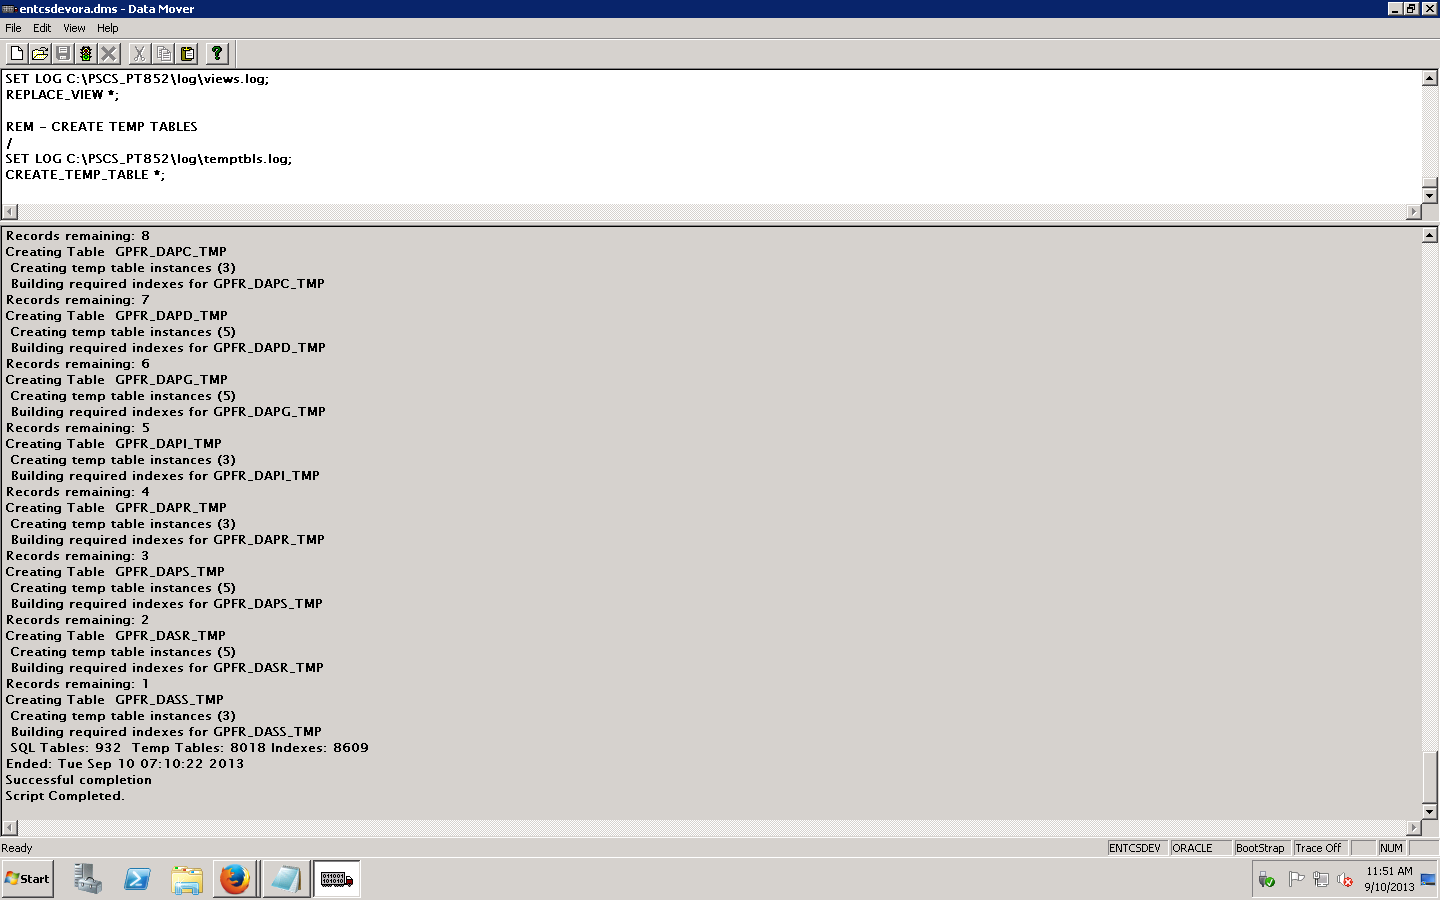
- Data Mover completed script execution successfully 13 hours later at 3am EST on 09/10/2013 (see screenshot below).
- Signed into Application Designer using username PS and password PS to test availability of PS objects; login was successful, and I was able to open two SR objects successfully (SSR_SSENRL_SWAP and SSR_SSENRL_CART).
Snapshotting EC2 Volume
- Created a snapshot on EC2 of both the Windows and Oracle Linux instance volumes.
Completing Database Setup
- Parts of this section have been adapted from this post (part 3 of 3) by Nic Gasparotto.
- This section aligns itself with the start of Chapter 7 of the PeopleTools 8.52 Installation for Oracle PeopleBook. At this point, all steps in Appendix B have been completed.
- On the Windows workstation, connected to ENTCSDEV using SQL Developer and ran the query
select TOOLSREL from PSSTATUS;- The value for TOOLSREL came back as 8.52, which means I didn’t have to run any SQL scripts to bring PeopleTools up to version 8.52. If you see a value lower than 8.52 here, you must follow the steps in Task 7-1 in Chapter 7 of the PeopleBook. Otherwise, continue to Task 7-2 (“Running Additional Data Mover Scripts”), which simply says that you must run any Data Mover scripts that are specifically required by the PeopleSoft application you are running. I found no such scripts for PeopleSoft CS (according to the PeopleSoft CS PeopleBook), so I continued to Task 7-4.
- On the Windows workstation, I opened a command window and ran
C:\PSCS_PT852\bin\client\winx86\psae -CD ENTCSDEV -CT ORACLE -CO PS -CP PS -R INSTALL -AI VERSION. - After ~1 minute, the Application Engine program ended normally.
- Created a shortcut on the desktop to
C:\PSCS_PT852\bin\sqr\ora\BINW\sqrw.exe. - Opened
sqrw.exeand filled out the following fields:- Report name:
C:\PSCS_PT852\sqr\dddaudit.sqr - Username:
SYSADM - Password:
SYSADM - Database:
ENTCSDEV - Report arguments:
-ZIFC:\PSCS_PT852\sqr\pssqr.ini -iC:\PSCS_PT852\sqr\ -fC:\temp\dddaduit.htm -keep -printer:ht
- Report name:
- Clicked
OKto run the SQR. EnteredENTCSDEVfor the database name and left the process name (optional) blank. - Report completed after ~10 mins.
- Viewed the log file at
C:\temp\dddaudit.htm; no extraneous records were found in any of the sections (a good thing). - To improve SQR performance, I followed the recommendation on page 214 (Task 7-6) of the PeopleTools 8.52 Installation for Oracle PeopleBook and appended the following text to
$ORACLE_BASE/admin/network/ENTCSDEV/pfile/initENTCSDEV.oraon the Oracle 11g instance:
appended to $ORACLE_BASE/admin/ENTCSDEV/pfile/initENTCSDEV.ora
# MQUINN 09-10-2013
# The following was added to improve run times for SQR
# reports. See page 214 or Task 7-6 of the PeopleTools 8.52
# Installation for Oracle PeopleBook for reproduction.
db_file_multiblock_read_count = 16
db_block_buffers = 2000
log_checkpoint_interval = 9999999
log_buffer = 102400
- Took the following actions on the Oracle 11g instance to apply the new PFILE settings to the database server via the SPFILE:
$ sqlplus / as sysdbaSQL> shutdown immediateSQL> startup pfile='/u01/app/admin/ENTCSDEV/pfile/initENTCSDEV.ora'SQL> create spfile='/u01/app/admin/ENTCSDEV/pfile/spfileENTCSDEV.ora' from pfile='/u01/app/admin/ENTCSDEV/pfile/initENTCSDEV.ora';SQL> shutdown immediateSQL> startup- Verified that the parameters took effect by reviewing the output of
SQL> SHOW PARAMETERS - Verified that the SPFILE (rather than the PFILE) was used to boot the instance by reviewing the output of
SQL> select DECODE(value, NULL, 'PFILE', 'SPFILE') "Init File Type" from sys.v_$parameter WHERE name = 'spfile';
- Re-ran dddaudit.sqr; didn’t seem to be a change in runtime but report still completed successfully.
- Ran sysaudit.sqr; report indicated OK status for all lines.
- Ran sysaud01.sqr; report indicated OK status for all lines.
- Ran setspace.sqr; report indicated that 90 PSTBLSPCCAT records were inserted, report completed successfully.
- Continued to Task 7-8 (“Running Alter Audit”) in PeopleBook.
- Signed into Application Designer as user
PSwith passwordPS. - Clicked
File>New. - Clicked
Project, then clickedOK. - Clicked
Insert>Definitions into Project - Selected
Recordsfor Definition Type andTablefor Type. - Clicked
Insertthen clickedSelect All. - Clicked
Insertthen clickedClose. - Clicked
Build>Project. - Checked
Create TablesandAlter Tablescheckboxes. - Ensured
Build script filewas selected. - Clicked
Settings. - Clicked
Scriptstab. - Checked
Write alter comments to script. - Opted to save generated SQL in
C:\Users\Administrator\PSBUILD.SQL. - Clicked
Altertab. - Ensured checkboxes for
Adds,Changes,Renames, andDeleteswere checked. - Checked
Drop column if data presentcheckbox. - Checked
Truncate data if field too shortcheckbox. - Ensured
Alter by Table Renamewas selected. - Clicked
Createtab. - Ensured
Skip table if it already existswas selected. - Ensured
Recreate view if it already existswas selected. - Ensured
Recreate index only if modifiedwas selected. - Clicked
OK. - Clicked
Yeson dialog box regarding potentially destructive actions. - Build process completed after about 20 mins.
- Clicked
Closeon the dialog box once completed. - Opened SQL Developer, connected to ENTCSDEV, and opened
C:\Users\Administrator\PSBUILD.SQL. - Reviewed PSBUILD.SQL; decided not to run the script for 3 reasons:
- Page 216 of the PeopleBook states that running Alter Audit is optional if the application database was delivered on the PeopleTools release being installed to. This was the case (installed release was 8.52, target release is 8.52).
- Page 216 of the PeopleBook states that triggers are always dropped and re-created during alter audit, and that “you can ignore the generated script for tirggers.” Since the generated PSBUILD.SQL only contained “CREATE OR REPLACE” commands for triggers, the whole file can effectively be ignored.
- The generated PSBUILD.SQL had several instances of “:NEW” in the file, which SQL Developer (rightfully) interpreted as bind directives. I don’t know the appropriate bind value to use here, and I don’t want to run the script if the triggers will be dropped but not reinstated.
At this point, the database is ready for use in a PeopleSoft Campus Solutions application environment. A web server and an app server are required in such an environment; I have documented the steps I took to set up a server capable of hosting both in this post.
A post about configuring the app and web servers for use with the database created here is now available in this post.